Our Master Bathroom Remodel
So, after having every single room in our house anywhere from 25-95% done for several months, I finally decided to buck up and finish a room... The master bathroom/closet... and I'm gonna tell you all about it.
Our goals were pretty simple. Make it bigger, more modern, more accommodating, and more "spa like" - a phrase thrown around wayyyyy too often during the entire process. Seriously. Almost every discussion that Kari disagreed with started with her saying, "well, that's not very spa-like."
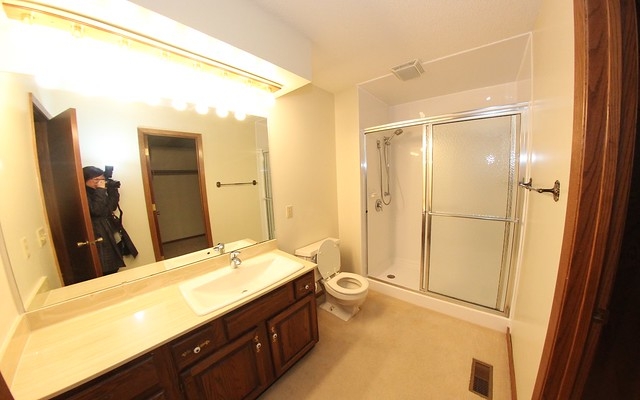 Anyway, the existing bathroom was very utilitarian but had some nice features, like a connected walk-in closet and ... well, that was pretty much it. Other than that, it had a sink, next to a toilet, next to a shower, and ... carpet floors.
To be more accommodating, we wanted a walk in shower with space for a seat, a sit-down vanity for Kari, and laundry inside of our closet (cause we had other plans for the existing laundry room, my mom raved about in-closet laundry, and we got tired of carrying laundry up and down 2 flights of stairs at our last house).
So, step 1 in this whole process was to figure out how we could expand the bathroom. Luckily, it shared walls with our entryway that used up a lotttt of (awkward) space, and an (also awkward) desk area in the living room. So, I sat down with a pen and paper, drew up a half dozen floor plans, got feedback from friends/family, and we settled on what I think is the perfect layout for us.
Step 2: demolition. This is the part that they quickly montage during all the HGTV shows because there's not really a whole lot to it... until you get to the part that sucks, which in our case, was the shower. There were so many layers of glue and... layers... and glue.
After demo came a bit of rough construction... i.e. move some walls, every bit of plumbing, light fixture, vent, outlet, some HVAC, a central vacuum outlet, and install a couple of pocket doors. All done by me and Kari's dad, Jeff. I touched nearly every building trade on this one and learned a TON in the process. I'm super thankful to have had Jeff's experience, the internet, and a couple books on hand.
- Electrical is not nearly as intimidating as it sounds. Code is straight forward. Stripping and dressing wires is also super relaxing.
- HVAC, though a bit cumbersome, is really simple with the right tools.
- Plumbing, especially drainage-waste-vent systems is also more interesting than I thought it was. There's a lot more to it than just making things "point down" to drain properly. Drainage is real physics.
- Central vacuum systems are fun with their baby PVC pipes. I got to know the local vacuum shop guy pretty well during this process.
- Pocket doors are tedious as shit.
So anyway, let's talk about the design.
 We used some of the entryway space to expand/relocate the shower and give the toilet its own little room. I was also able to use some of the awkward living room desk area to squeeze in a second, seated vanity for Kari. But even with the expansions, we were still trying to cram a LOT of stuff into a pretty conservative amount of space, so we had to be super thoughtful on the placement of everything and make heavy use of pocket doors, concealed shelves, drawers, etc.
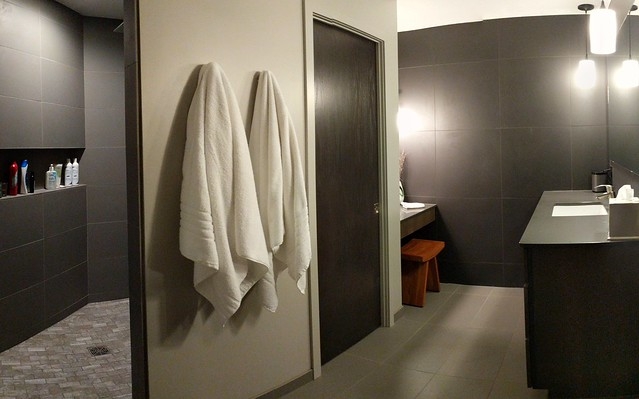
We also worked really closely with our friend Kari Lantz to come up with the soft, "spa like" color scheme, wood finish, tile selection, and that big slate tiled wall.
In the shower, we went with floor-to-ceiling tile, the biggest shelf I could squeeze into the wall, a rain shower head, wand, and space for a small teak bench. We also designed this shower so that we wouldn't have to have a shower door because... well, I'm not trying to spend every morning squeegeeing off my damned shower door.
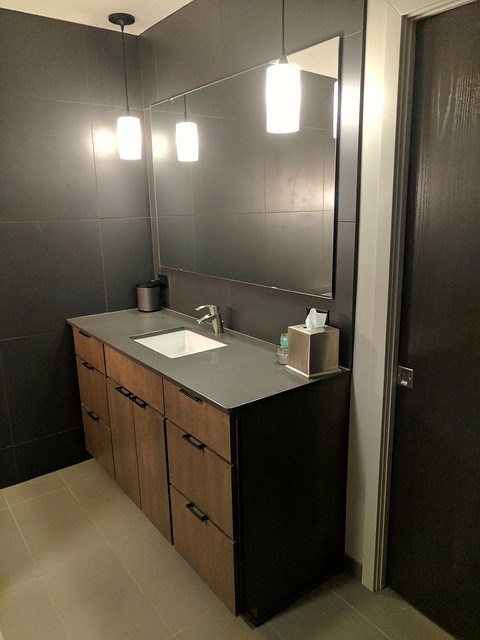 For the vanity, we went with as many drawers as possible to maximize storage, a single hole faucet cause it's less stuff to wipe off and side pendant lighting, because, apparently side-lighting is good for doin vanity stuff.
In Kari's sit-down vanity, we added a concealed medicine cabinet and a (powered) drawer for storing a straightener and apple watch charger n such. It's also got a custom, 2 swag pendant that I designed for more sweet side-lighting in such a tight space.
Speaking of power, we tried to be super strategic with that as well. There's an outlet in the corner of the vanity that was placed specifically with a sonos speaker in mind. Another outlet inside the vanity so that our powered toothbrush can sit in a drawer and not on the counter. And I also placed an outlet by the toilet for whenever I get that future japanese toilet seat I've been hankerin for.
For night time convenience, I added a second light switch that turns on a strip of dim LEDs below the toe kick of the vanity and a very dim light in the ceiling of the toilet room. All the other lights are dimmable too.
The main fan in the room is a moisture sensing ventilation fan... mainly because I got tired of coming into a completely steam filled bathroom after Kari got done showering, but also because the bathroom shares space with our closet/laundry room. It works super, super well to keep the rooms dry.
On top of that, we installed a Rubbermaid shelving system in the closet, and splurged on some heated floors throughout.
Along with design help from our friend Kari, the only things we hired in this master bath/closet remodel were paint (even though I've had to redo a good chunk of that), drywall, and tile ... because I wasn't about to learn how to tile by hanging those large format dudes on our walls.
Ok, that was way longer than I intended it to be... Here are some more photos of the project!